
If you want more security in your Google forms then here is the way to add a picture password to your Google Forms with the help of simple 5 step guide to implementing this.
Google is well known for its very potential security implementation on every of its online service and Google Forms being one of it’s well know and used service is not kept apart from that. Although in fact it is highly protected with superb class security that the users would indeed require also to prevent their data. But as the Google Forms are either available to be accessed by the whole of the public or many of the people, and you won’t remain sure about whether or not the newly filled form is spam or not. This is where even the Google Forms could get up slipped by the security. Now, what could be done so that the security for the Google Forms could be made top-notch, and hence the spam or the bots be pulled away? There is something great! You could set up the Picture password or the CAPTCHAs to your Google Forms, and this would be the best one. Don’t you know about how to set up the picture password on your Google Forms, never to worry because we have written the method in this article will help you to easily learn to set up and make the picture password for your Google Forms? Just go and read the whole article to know about that method.
Also Read: How To Become A Good Programmer
How to Add a Picture Password to your Google Forms
Google Forms do not support the CAPTCHA by default, but this feature could be implemented in it through using the attached images used with the questions.
Also Read: All Important Programming Books for Beginners
Steps to Add a Picture Password to your Google Forms:
- First of all, open the new Google Form and then create the three sections, the first section being picture password, the second one is the section containing the error message that would appear if any user fills up the CAPTCHA incorrectly. The third section that you would be creating will contain the questions that you would rather wish to ask for your users.
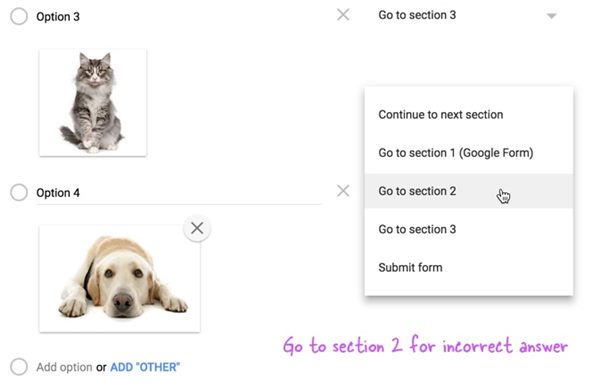
- Now taking up the first section that you have created, just create the multiple choice question and then after that attach the different image with the particular choice for the question. Make this question a must to answer the question and then turn on the shuffle order for the question choices. Not only that but you should also turn on the another option named “Go to section Based on the answer,” this one is required so that for only valid answers the users are taken to the next main form.
- Set up the “Go to section 2” for the wrong question choices or the answers that are not valid ad also choose up the “Go to section 3” for the right choice. In section 2, you have to put the error message rather than putting any of the questions for the users who have failed to answer the choice correctly.

Add a Picture Password to your Google Forms
Source: Labnol.org - Another thing that you would have to implement is that you have to set up the option “Go to section 1” for the section 2 so that the failed users cannot pass to the main section of the Google Form.
- Now after all that, you have just to do one another thing, and that is to make your Google Form Live, and you would see that the respondents would be able to see up only the questionnaire if they have passed the CAPTCHA test that you have created right using the above steps. That’s all!
Also Read: Best Hacking E-Books Free Download
And after reading this article you might have got about the method by which you could now easily set up the Picture Password or the CAPTCHAs for your Google Forms, and eventually, protect it up from being traced by the spams or the bots. You should pretend to use the method and apply the picture password so that your Google Forms account would remain clean and secure all the times and moreover contain the true forms filled up by the real users.

